Create New Rule
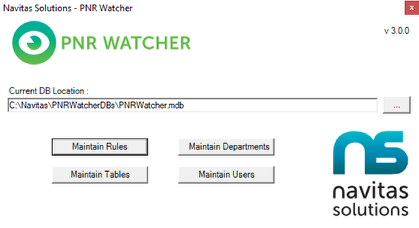
If not already running, start the PNR Watcher Administration tool.
The above screen appears. Select Maintain Rules.
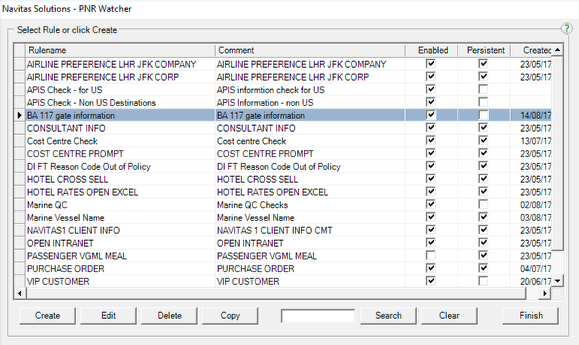
The screen displays a list of current rules.
Actions Tab
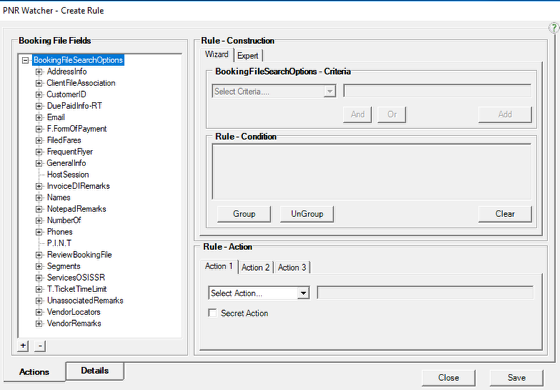
Click Create on the PNR Watcher Maintain Rules screen. The above screen appears: Data must be entered in to each section of the screen and both tabs before a rule can be saved.
Booking File Fields
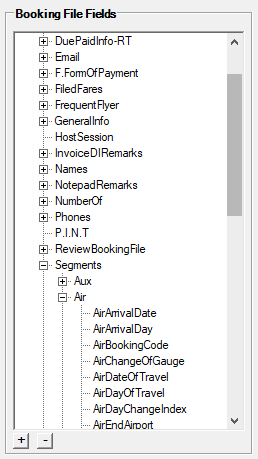
The Booking File Fields screen details the sections of the booking file that can be selected for searching.
Click the + next to BookingFileSearchOptions to display the headings for the search criteria.
Use the + and - buttons to expand and contract the Booking File Search Option headings to display the possible search criteria. For example to perform a rule on the air booking code stored in the booking file, expand BookingFileSearchOptions, Segments, Air and select AirBookingCode.
Once the Booking File Field is selected, move to the Booking File Search Options - Criteria section.
Booking File Search Options - Criteria
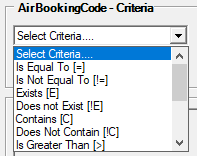
The XXX Criteria section (where XXX is replaced with the Booking File Field selected in the above section) is the area where the search criteria operator and value are added. In this example it becomes AirBookingCode - Criteria
Click the down arrow on the Select Criteria field to display as list of possible operators. Select the operator to apply to the Booking File Field.
Refer to the Rule Operators Explained section for further details.

If the operator requires a constant the text box becomes active as shown above. Add the value that the PNR Watcher should match against and click Add.
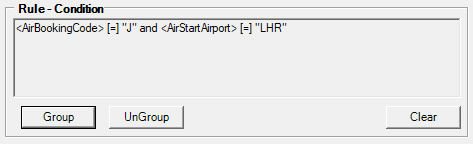
The completed rule is added to the Rule Condition area of the screen.
To add further criteria to the rule click the And or Or logic buttons. This allows the previous steps to be repeated again, so a full rule expression can be built.
Rule Condition Screen
This section displays the completed rule as it is built.
It gives the ability to use grouping to clarify the rule expression. Additionally the rule can be edited on this screen.
The screen above shows the Rule Condition screen with an example Air Vendor and Flight Number rule:
Grouping / UnGrouping Logic
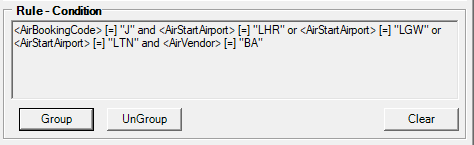
Grouping logic statements together allows fine turning of rules where multiple fields are being validated against. Normally, the logic of a rule would be evaluated from left to right, however grouping logic can have a dramatic effect on the rule outcome.
In the screen shot example, the rule checks the booking file for a flight by BA or flights that leave from London Heathrow. The rule must also check if there is only one passenger in the booking file and that a DI.AC field exists.
If the booking file did have BA and was leaving from London, but had two passengers and a DI.AC, without grouping, the rule would ultimately end up being False.
Rules Action Screen
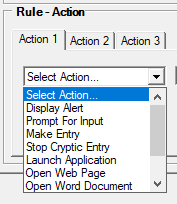
Once the Rule Condition is complete the Rule Action must be assigned. Each rule can have a maximum of three different actions, but requires a minimum of one. The blank Rule-Action screen is shown below:
To add an action select the down arrow on the Select Action field. The above drop down list is displayed.
Select the required action from the list. The action arguments field now becomes active.
To add further Rule Actions, click [Action 2] or [Action 3] tabs. Once all is completed click on the [Details] tab.
Refer to the Rule Actions Explained section for further details.
Details Tab
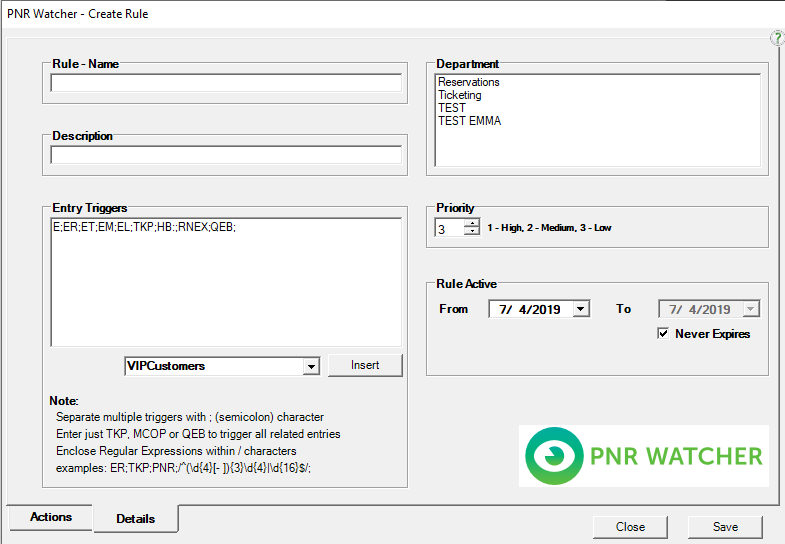
On clicking the Details tab the above screen appears.
Enter a name for the rule in the Rule-Name field, and a description of the rule in the Description field. These are displayed on the Maintain Rules screen and help to distinguish one rule from another for editing/deletion purposes.
*Best practice is to introduce a naming strategy i.e. all airline related rules start with the 2 letter airline code / all client related rules start with the BAR title
*IMPORTANT; the special characters < & > " ' should NOT be used in the rule name as this can cause errors.
The Departments section lists all available departments. No department is selected as default. One must be selected from the list (even if the list contains just one department). Multiple departments can be selected from the list by holding the Ctrl key while selecting the department names.
The Priority section sets the Priority level for the rule. There are three levels as described:
1 = High (Alerts and Actions are displayed in Red at the top of the alert window)
2 = Medium (Alerts and Actions are displayed in Blue and will follow any high priority rules on the alert window)
3 = Low (Alerts and Actions are displayed in Black and will follow any medium priority rules on the alert window)
Use the up and down arrow buttons to set the level.
Rule Active allows you to set when the rule will be active From and To. If you wish to set an expiry date uncheck the Never Expires box and use the calendar drop down to select your expiry date.
The Entry Triggers section allows you to specify on which entries the rules will trigger. If you wish to trigger a rule on another entry other than END, TICKET and QUEUE then these must be entered as a Regular Expression. Further details on this can be found in this guide.
A list showing available Tables allows you to utilise entries in a Table as part of the Entry Trigger.
Then select [Save].